MYX

Jun 132009
 

I have been interested in natural energies for a long time. Even back before it was the cool, “in” thing. I am being a touch snarky as I hate how the media can dictate a fad. “Red is the new orange” and all that. I guess this is not really the point is it? So, yeah, I have been interested in natural energies for a long time. I used to live in California. There was a rather steep hill in our back yard. From the top, I could see the wind farm that was close by. There were so many great shapes and methods of working. If you drove east, there were stretches of  windmills that went on for miles. They were so massive. I think that this was some sort of testing ground as there were the traditional designs in a variety of forms. But then, there were these oddball designs unlike I had ever seen. They looked like a bastardized carrot peeler stood up on end, and a big one at that. These things captured my imagination. They were VAWTs or Vertical Axis Wind Turbines. It was not immediately obvious how they worked. We moved from Ca. and I quickly forgot all about them.

A couple of years ago we went to Disney World. Walt has always been one of my inspirations. Here you have a guy who wanted to build cool stuff, and needed a way to fund it, and more, a place to put it. So he creates Disney Land. The day we went to EPCOT, I saw all sorts of windmills all over the park. They were used as more moving sculptures, not as electricity generating devices, but they were beautiful. They moved so effortlessly in very little wind. This was my spark.

When we returned home from DW, I went in search for info on windmills. Initially, I was reading about horizontals. I did not know what to name the verticals. In my mind they were just windmills.  I checked one of my web hang outs “Instructables”. There were several DIY how to’s. Some had links to YouTube vids. After watching the vids, I was lured into other streams of vids. I traveled up and down all of these little bits of education, trying to scrape just a little more detail that someone else had left out. This seems to be my pattern for new interests. Eventually I found that they were called VAWTs (vertical axis wind turbine). I finally had a name to put to the thing. You know, as far as acronyms go, VAWT just looks intimidating. Right? Oh… never mind.

I started looking for a design to settle into. There are so many great ideas out there. Some that were super simple to rather complex and overly engineered. Hmmmm. While I do appreciate overly engineered, I did not want to go too crazy right out of the gate. There’s plenty of time later for that. Right now, I needed a proof of concept for myself. I am sure I have said this elsewhere, I do not like to make a photocopy of someone else’s idea. If that’s all I was interested in, I might as well just go out and buy one. I saw a post somewhere about Jay Leno. Apparently he is very interested in all types of green energies. This video shows one of his earlier windmills. It is built by a company called Enviro Energies.

Edit: The video is no longer available as the company has gone out of business, link removed.
Update: Someone put the video on youTube with another company name on it, so I am linking to it again.

The shape of that windmill was well within my doing. It was head out to home depot in search for metal that would not rust. I found some galvanized flashing sheets. I got 2 sheets for $6. I would not supposed to though. When I went to pay for it, the lady said that it they would be 28 dollars. I told her that it was $6. We went on a walk back to the shelf where I found them. Apparently this was the price of an old item and had not been updated. She said that it was their fault and gave it to me for the price that was listed. Woohoo!

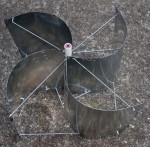
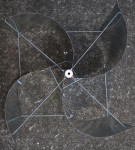
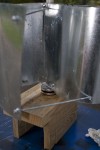
I used only one sheet of the flashing, cut it into 4ths with the angle grinder. I had some PVC tubing in my garage. I cut a small length. I drilled 4 holes at 90 degrees to each other (eyeballed), and attached the sheets with rivets. The trick here is precision folks (insert snirk here). I am sure that there was some serious math taken into consideration when Enviro Energies were developing their model. Aside from trying to keep the thing balanced, this thing was built on the fly. It was a rough draft. I wanted to see it work before I put mass amounts of energy into it.

I used several lengths of all-thread to hold the blades in place. I decided to keep the full height of the blades unlike the blades on Jay’s. There very well may be a reason to swoop them off like that, but it seems like you would loose too much surface. I purchased some bearings off eBay. These fit perfectly into the PVC tubes. I scrounged the center shaft out of an old printer that my son and I took apart.

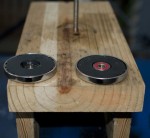
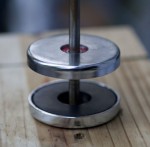
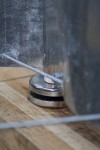
I like the idea of mag lev to reduce friction. I went out to ACE in hopes to find some magnets. I found some fairly decent 60lb. magnets. I super glued a set of bearings to the center of the magnet cap. I placed the magnets on the shaft. I put the windmill on top of that and it floated nicely. Very cool! To get some extra height, I set up a ladder on our back porch. I set the windmill on top of it, and used a ratchet strap to secure it in place.

It works great. In wind that is barely perceivable, it just spins. It is not super fast, but it is continuous. This one was not designed for electricity. Again, it is a test of design (or lack there of). The next one will be larger and placed on something a lot higher. It was quite impressive to watch.

This post ends with a small bit of bad news. We got a storm one night. I love storms and this was a good one. The wind was fairly extreme. I was in the kitchen and had not thought about the fact that the wind mill was up. I heard a sickening whomp from the back of the house, then about a second later, a sad little clang. I ran to the back porch and found that the ladder was there, but no windmill. The ladder on it’s side leaning against the rail. I went down stairs, and into the back yard, and there lay my poor little windmill in a heap of bent metal. It was sort of funny, and sort of sad, but more funny.  I am excited about building another one.

SAFETY NOTE: (Both galvanized steel and the disks from the angle grinder can produce substances that “may cause cancer” in the state of California. It is what the label said. Now, I am no genius, but I have a hunch that it might also be harmful in other places too. Hmmm. Seriously though, be safe and wear some sort of respirator, or at least a face mask if you are using this stuff.

Edit:(New Info) – I have recently found some info that states that friction reduction via mag lev may actually not be helping that much. It appeared to make things run more smoothly on mine, but I have no real way of testing aside from what I saw visually. The article I read had all sorts scientific proof blah using all sorts of crazy high math blah blah, with all sorts of clever symbols found in the reverse engineering of a UFO tech in Roswell. Ok, I admit it, I suck at math. I do pretty well when I have something to apply the math to. I tried to follow this guy, but come on… Really?  So I have not settled into a new design yet.

 Posted by at 8:32 pm
May 062009


We had a staff meeting at work. The topic of discussion was Relay for Life. Our department usually participates in some way. This year, there was the challenge of making a car out of boxes which would be carried around the track at midnight in a race. requirements were simple. It had to make it out of a box (duh), and it must have headlights. Seeing mass geek potential, I volunteered to build the car. I am not one to go to if you just want dirt simple.

I started to plan a rugged, heavy duty, off road kind of thing. Soon after we got a fairly massive UPS. The box was perfect. It was this crazy heavy duty cardboard. There was also this wonderfully shaped packing foam in the box, so that got grabbed as well.

One of the women who would be carrying the car is a cancer survivor. So, this was a custom build, just for her. She said that her car was going to be pink. Pink? Really? um… ok then. She said that we could also have purple trim if we liked. I decided on duct tape, and gaffers tape for the construction and vehicle color. Inspired by the shape of the foam, I set out to build her a hummer. A BIG PINK AND PURPLE HUMMER!

For the headlights, I wanted to go over the top. I decided that this thing needed a operational lighting system. Sure, we could throw in some flash lights, but I wanted bigger, and far brighter.

I have been experimenting with white LEDs for a camera flash system I have been working on. I decided to make panels of LEDs for the head lights. But really, how safe would a car be if there no brake lights, and blinkers? So, I made some LED panels for the rear too with real working blinkers and brake lights. This was all connected to an Arduino (Boarduino) through some FETs. I used 2n2222 for the left, and right blinkers as there was not as much amperage to worry about (Only 16 LEDs). There are 40 LEDs on the each brake light and and 40 each on the headlights. I got hit in the eye a few times with one of the head lights, and it was a wee bit painful. The brakes are each on PWM pins on the Arduino so that they could be slightly lit (because they are on when you turn on your headlights, right?), but then have the ability to go full bright during left and right blinking, as well as braking, all of which was controlled from a little button box. On the back wall of the car I made a LED ribbon out of pink LEDs. My initial intention was to do a 4 channel chase with the ribbon, but there was just not enough time.

The Relay night came. They took the car out to the track. They kicked on the lights and the 80 10,000 mcd white LEDs in front really lit the place up. They had a good time racing the pink beast around the track. Our car won for design.

Mar 202009
 

This is a test… It is only a test. Had this been a real explosion… Dude in the truck would be toast. This is a composite that I made in AE some time back. Occasionally, I’ll challenge myself to re-create something I see. I saw a number of clips on YouTube that were IR camera recordings of aerial bombing missions. While I was looking for reference clips to study, I found it interesting how much they varied. I built my HUD in AE (Not saying much as it was really not very complicated). The rest was made with nothing more than the photo below. The explosion was made with 4 separate partial systems. All are Trapcode Particular. The glows are Trapcode Star Glow.

 Posted by at 10:01 pm
Feb 152009
 

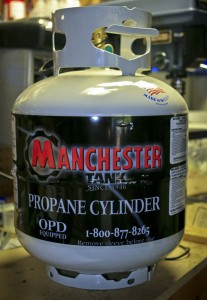
My brother and I have always been interested in all types of percussion. One piece that we both geek out on is the Hang Drum. They have a very unique sound. If you are interested, here is a clip of a guy playing the hang. I decided that I would get my brother a hang for his birthday. I did some research and found the pricing. Once I picked my jaw up off the floor, I decided that perhaps I would not get a hang for his birthday. The things cost between $4,ooo up to $10,000. I love my brother, but that is too rich for my blood. So, being a maker of things, I set out to try to figure out how to make a hang. After a bit of searching, I stumbled onto a similar sounding instrument… The Hank. It can be purchased, but better, it can be made. It is a hang drum sounding instrument built out of a propane tank. There are various ideas about the how the name came into being. I prefer the theory that it is based on Hank Hill. Hank sells propane and propane accessories.

In my quest to look at everything I could find on the Hank, I saw many different ways of going about building it. I decided to base my build on the Hapi drum because when I listened to samples, the Hapi had some of the nicest tones. Some sites lay it all out on out how to build a hank drum with rounded tongues. I am not sure I totally agree with the shape while trying to keep a smooth vibration. The Hapi drums have more rectangular tongues. The only problem is that I did not see any plans on layout. So, I snagged a picture from the Hapi site and blew it up. I then decided on notes and found out what the frequencies were for each note. My theory was this… If sound holds true to it’s laws (which would be a problem if it didn’t), a longer tongue will have a lower pitch than a shorter one, so a template to trace from was irrelevant.

First things first. I have read it elsewhere and I think it bears repeating…
DO NOT TRY THIS WITH A TANK THAT HAS EVER HAD PROPANE IN IT. IF YOU DO, MORE THAN LIKELY YOU WILL BLOW YOURSELF UP AND THAT WOULD BE REALLY SAD!!!

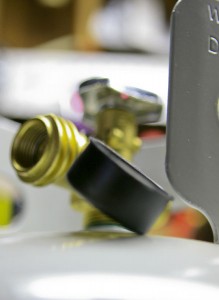
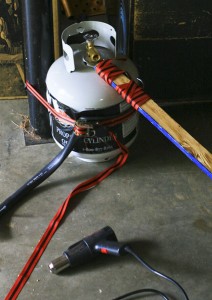
I bought my empty tank from Home Depot. It was about $35. The first order of business was getting the stem out of it. I read many places that this would be difficult, and it was. I found one site that had the recommendation to heat up the stem with a heat gun. This will melt the glue that keeps it in place. This worked rather well. Plus, I attached a large plank to the wrench for extra torque. It was not a glamorous wrench mod, but function outweighed beauty. Once it started to move I kept it moving, but very slowly. There is difference of air pressure inside the tank. Eventually I heard a hiss. When the hissing stopped I finished unscrewing the stem. It had a large bulb thing on the end so it was a little goofy getting it out.


The next thing I did was take the bottom ring off the bottom. I decided to use the angle grinder. It did a fine job of munching through the metal. Sidetrack… I need to throw out a word of warning to those who would set up, and take a picture of flying sparks. Sparks are pretty, yes, and do make for nice photos (although I am not so keen on this one), but sparks are sparks because they are hot. Very hot. Hot enough to melt into the UV filter sitting on the front of your camera. If you look at the filter (which I kept as a reminder) there are little bits of metal sticking out of it. The camera was about 4 feet away, and the sparks were still hot enough to burn into it. It was total confirmation as to why I put a protective glass UV filter on the front of the lens in the first place (aside from the obvious benefits of the UV filter). The decision between buying a new $70 filter, or a new $1,300 lens  is an easy one.

Once I got the ring off, I grinded the bumps down to the surface. I continued by removing the paint. This was not as easy as I though it would be. That stuff is stuck on there really well. I went through 3 sanding disks to get down to metal. (Wear a mask as this stuff gets everywhere).

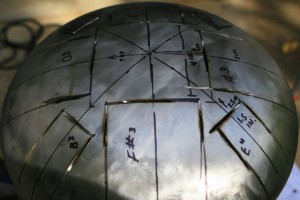
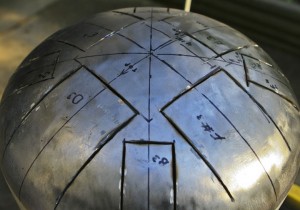
I started working on the layout and design. It was kind of a make it up as you go job. I got an X and Y baseline marked out, and measured out the area. I knew I was going to have 4 tabs in a cross pattern and 4 smaller tabs in an X pattern. The smaller tabs would be approximately an octave above the larger tabs  so I decided to make the smaller tabs half of the width of the larger ones.  I used a Sharpie to mark out the cutting pattern. I also wrote the note name and lay out.

I started to cut the tabs. cutting into it created beautiful fountains of sparks. I wanted to take pictures, I really did, but I was a little freaked out after the last little bit of sparkage. I used the angle grinder for the initial cuts, then switched over to the Dremel for the finer cuts. I use a Palm Treo. I have a very nice guitar tuner on it called Phone Tuner. Update: I am now using Android and am using gStrings for phone based tunings. It works great. I used it to tune the drum. I made cuts down the sides of the tungues, then I would tune. I totally goofed on one tongue and had to cut it down to pitch. This left a hole on the side, but it still played well, it just looks a little goofy. So I made smaller cuts and used the dremel a lot as it was much slower in cutting than the grinder. I would make several cuts then I would check the tuning. Then more cuts, then tune. It was a rather repetitive task, but eventually it started to come into tune. Several times I got side tracked playing the thing instead of cutting it.

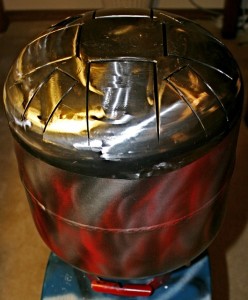
Once the tuning was where I wanted it, I started into a final polish before I painted it. I wanted the top to stay the fresh brushed metal look, so it had to be really smooth. I used a fine sanding disk on the angle grinder. I spent a fair amount of time on this part. I would start at the very edges and spiral my way up to the center. If I goofed and lifted up, or got out of alignment, it was very obvious. I kept at it until I got a very shiny dome. The side effect of sanding a tuned drum, is that it makes a very loud ring. It was very cool. I would start on the edge and it would start with lower tones. As I moved closer to the center, the ring started revealing all sorts of harmonics. It was too loud for uncovered ears, but even with protection, it was beautiful.

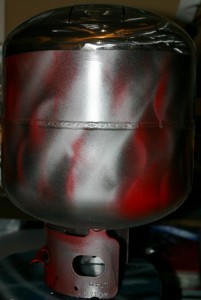
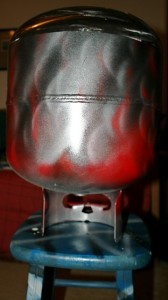
I covered the top metal with several layers of clear coat so it wouldn’t rust. Once that was dry I masked off the top in prep for the bottom. I also plugged up the hole that the stem was in with a wad of paper towel so stray spray would not enter it. I went to crazy on the drum with silver, red, and black spray paint. I was trying to make flame sort of wisps. Having recently watched one of the over haulin’ type of shows, I got the idea of using a stencil mask. I started with aluminum foil that I could bend to all sorts of different shapes. Then I would spray at it and whatever missed the foil, would hit the Hank. Then after a few wisps were painted, I would bend it and paint again. The stupidity and shortsightedness lay in the fact that the paint on the foil would be wet when I bent it. Yeah, duh. After a while I switched to a pineapple can that had both ends cut out. This made some very nice shapes. Once I had covered it with far too much paint, I then went over it with a couple of layers of clear coat to add some protection to the paint. I figured that because it was a drum it would get dinged up rather quickly. I did not have time to take pictures as my brother came into town the day after I got done painting it. I had about enough time to run upstairs and hide it as he pulled into the driveway. He loved it. He said that it has actually gone on stage a few times. I asked him to take a few pix.

Jan 012009


This was a test vid I edited in January 2009. It was shot on the Panasonic HMC-150. We were trying to get the AVCHD workflow sorted out. So, we went to the local car wash and started shooting. I edited in Adobe Premiere Pro directly off the chip.I would kind of like to remake this but actually spend some time on setting up some nice shots. This was really more or less, just a run and gun.

The guy at the car wash was cool, he just let us walk around wherever we wanted to go. It is the type of place where the driver gets out of the car and waits while the car is washed. So, really, there was no one freaking out at us if we got too close to their car. The only real worry was the spray from the wash. When the jets hit, it creates wind. The wind blows the spray everywhere. I kept a close watch which way the spray was going for several cycles before getting some of these shots.

I found this music and started to edit to it, just to have something to cut to. The more I played with the footage, the more I got to like the music. I find it odd how you could manipulate something without any real meaning into something with the right music. I decided to keep it. It is totally goofy and melodramatic, but it sort of works (as far as a video about car washes can… well… work).

 Posted by at 5:32 pm
Nov 022008


This was a quick test using Trapcode Particular and Horizon. I used a number of expressions to self animate the particle system as well as the camera. Even though it was just a test, I really liked the feeling of movement. It would make a really bad amusement park ride.

 Posted by at 8:13 pm